Frequently asked questions
How much concrete does a Sonotube hold?
Round pier volume = π × radius² × height. A 12-inch tube holds about 0.029 cubic yard per foot of fill; multiply by the filled height and the number of identical piers, then add a waste allowance for overbreak below the tube.
How deep should a pier go?
Carry the bottom below the local frost line and onto soil that can support the load — often 42–48 inches in cold climates. The frost depth and bearing requirement come from the foundation detail and local code, not the tube length.
Do Sonotube piers need rebar?
Structural piers that resist uplift or lateral load are reinforced per their design, typically with at least six vertical bars and ties or a spiral. Non-structural pads may not need steel, but follow the project's pier schedule.
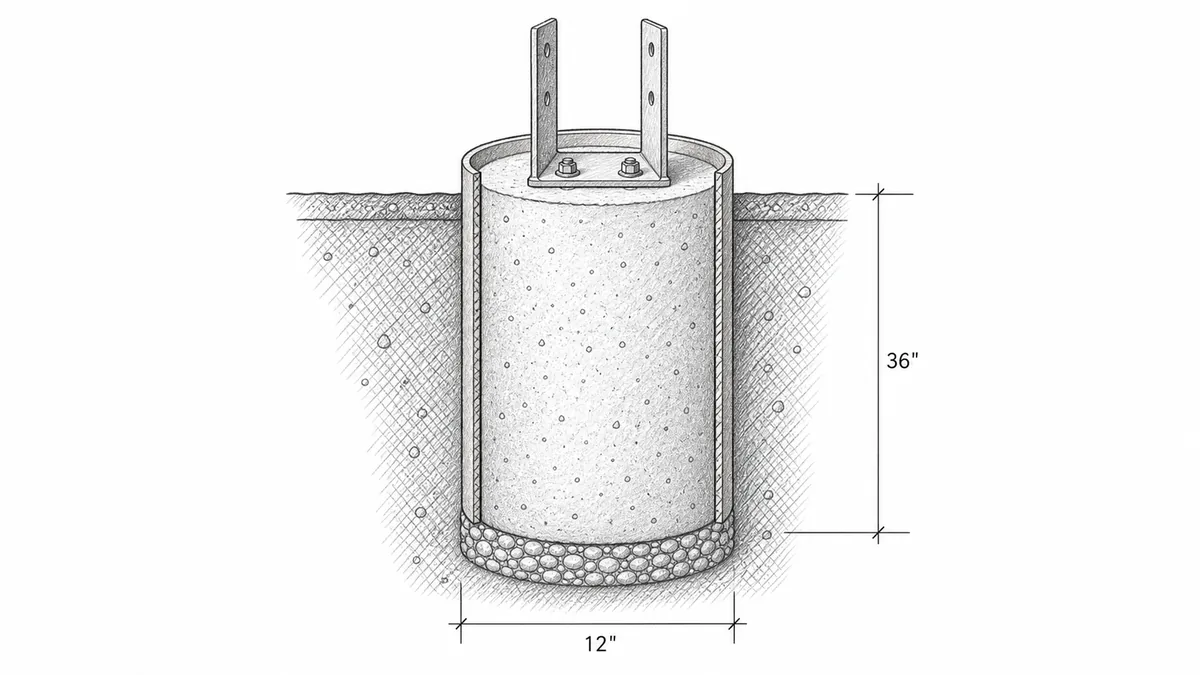
The cylinder formula
Measure the form's inside diameter and the concrete height. Divide diameter by two to get radius. Keep units consistent before multiplying.
A 12-inch-diameter tube filled 4 feet high contains about 3.14 cubic feet, or 0.116 cubic yard before waste. Because radius is squared, diameter errors matter: increasing diameter from 12 to 16 inches increases cross-sectional area by about 78 percent.
Concrete height is not always hole depth
The tube may stop above a flared base, start below finished grade, or extend above grade. Use the total concrete geometry, not one convenient field measurement. Calculate enlarged bases, pads, or caps separately.
Earth-formed portions add uncertainty
An augered hole can be larger than the nominal bit size because of loose soil, rock removal, collapse, or cleanup. If concrete fills an open earth section below the tube, include that shape and choose a waste allowance that reflects overbreak. Do not assume the cardboard cylinder controls all concrete below grade.
Avoid letting concrete free-fall more than 5 to 8 feet past reinforcement. On deep piers, use a drop chute or a temporary extension tube to deliver concrete directly to the bottom of the hole; a long uncontrolled drop causes heavy aggregate to separate from the cement paste, producing weak zones or rock pockets in the lower section. Keep the vibrator moving in short strokes — consolidation in a round form is effective but easy to skip near the tube walls.
Frost and bearing requirements control depth
Pier diameter, embedment, bearing, uplift, lateral resistance, spacing, and connection details are design decisions. The calculator's frost guidance reports an approximate state value but cannot tell how much of the entered pier height is buried. Verify local frost depth and the approved foundation detail.
Structural piers typically specify 3,000 PSI minimum concrete. In freeze-thaw climates, any pier section that extends above grade and will be exposed to weather should use air-entrained concrete with 5–7% total air content, as required by IRC Table R402.2 for moderate and severe weathering regions; without air-entrainment, the exposed cap tends to scale after the first winter. Clear cover for reinforcement is 3 inches on faces cast against earth, and 1.5 to 2 inches on formed faces exposed to weather depending on bar size. Use plastic or concrete spacers rated for the pier diameter to hold the cage centered before the pour.
Cage output is a takeoff, not a design
Pour Ready can estimate longitudinal bars and closed ties or a spiral from entered bar sizes, count, spacing, and cover. Those inputs must come from the plans or responsible professional. The tool checks basic geometric feasibility and stock-length quantities; it does not establish structural adequacy, development, splices, hooks, or connections.
Estimating multiple identical piers
The planner's quantity field totals concrete, bags, cage materials, and cost for up to 999 identical piers in one estimate. All piers must share the same diameter, height, and base shape; calculate different sizes separately. For many small piers, also consider cumulative placement loss, leftover concrete between batches, and whether bag mixing can maintain a consistent placement schedule.
Concrete per foot by tube diameter
Because area grows with the square of the radius, tube diameter drives the order far more than height does. Use the per-foot figures below to sanity-check a quantity before ordering — multiply by the filled height, then by the number of identical piers.
| Tube diameter | Volume per foot | 80 lb bags per foot | Common use |
|---|---|---|---|
| 8 in | 0.013 cu yd | ~3 | Deck and fence posts |
| 10 in | 0.020 cu yd | ~5 | Light deck piers |
| 12 in | 0.029 cu yd | ~7 | Deck and porch piers |
| 16 in | 0.052 cu yd | ~12 | Heavy deck and beam piers |
| 18 in | 0.065 cu yd | ~15 | Structural columns and posts |
Step by step: pouring a round pier
A pier is simple geometry but easy to ruin with segregation or a floating form. This sequence follows Caltrans cast-in-drilled-hole and IRC practice.
- Auger and clean the hole. Bore to bearing soil below the frost line, then remove loose spoil and pump out any standing water so the concrete is not diluted at the bottom.
- Set and brace the tube. Level the base, plumb the Sonotube in both directions, and brace it at the top so it cannot drift or float upward when concrete is placed.
- Center the reinforcing cage. A circular cage uses at least six longitudinal bars; hold it centered on dobies that maintain 3 inches of cover against earth or 1.5–2 inches on a formed, exposed top.
- Pour without segregation. Do not let concrete free-fall more than 8 feet past the steel. Use a hopper and "elephant trunk" drop chute to deliver it vertically through the cage to the bottom.
- Vibrate in lifts. Fill in 15 to 20-inch lifts and consolidate each with short vibrator strokes, paying attention to the zone against the tube wall where voids hide.
- Set anchor hardware. Place post bases or ½-inch anchor bolts to about 7 inches of embedment while the concrete is still plastic, then hand-float and re-float the top to seal it against moisture.
- Strip and cure. Peel the cardboard tube after a day or two and keep any exposed pier top damp or sealed for 7 days.
Sources and further reading
Use this guide with the Pour Ready methodology page, the pier schedule for your project, and local frost-depth or deck-foundation requirements.
- ACI 318 official code page for structural concrete scope and reinforcement boundaries.
- 2021 IRC Chapter 4 Foundations for residential footing and frost-depth context.