Frequently asked questions
How thick should a sidewalk be?
Residential walkways are commonly 4 inches thick. Where the walk crosses a driveway or other vehicle path, thicken that section to 6 inches and reinforce it, calculating it as a separate pour.
How far apart should sidewalk control joints be?
Keep spacing at or below about 24 times the slab thickness — roughly 8 feet for a 4-inch walk — and aim for near-square panels. Narrow walks often joint closer, at about the slab width.
When should you cut sidewalk joints?
Tool joints immediately after finishing, or saw-cut 4 to 12 hours after the pour — early enough to beat random shrinkage cracking but late enough that the saw does not ravel the edge.
Break the route into rectangles
Measure each run where width and thickness remain constant. Add separate rectangles for landings, widened entries, turns, and door pads. Curves can be approximated from smaller sections or measured with a method appropriate to the geometry. The cleaner the section list, the easier it is to verify forms and order quantity.
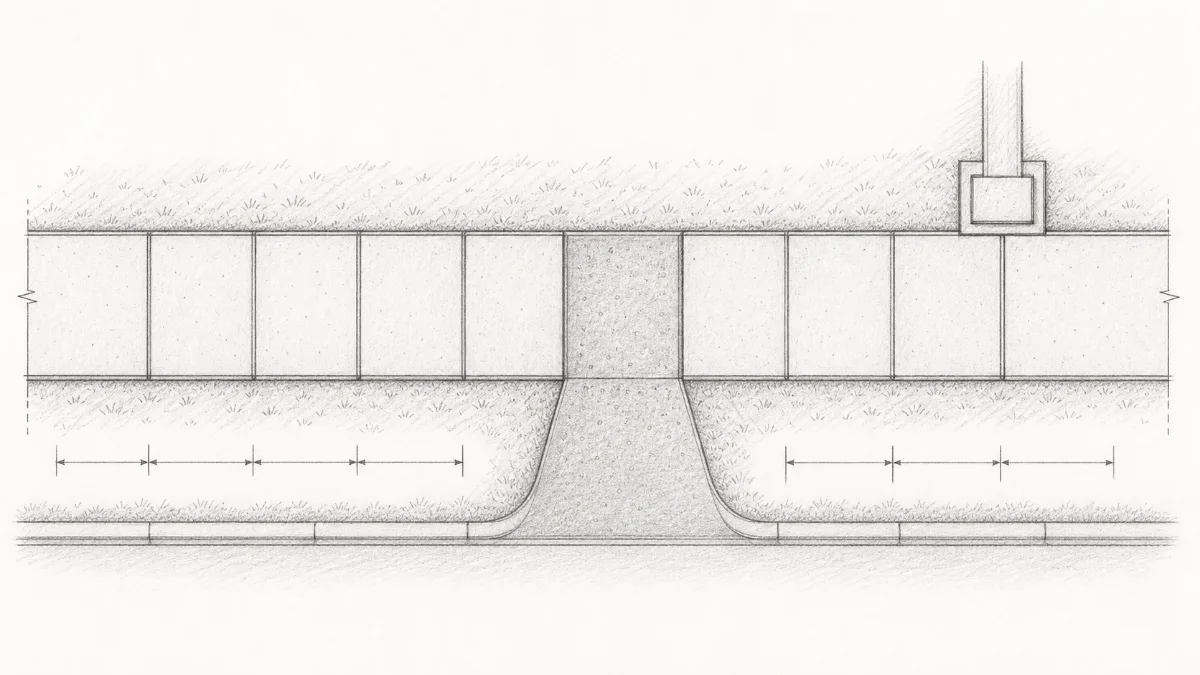
Do not hide vehicle crossings in the average
The default front-walkway preset is 4 inches thick. Pour Ready also includes a 6-inch, reinforced vehicle-crossing preset. A path that crosses a driveway should be split so the load-bearing section is calculated from its own dimensions and requirements.
Public or accessible walks may have prescribed width, slope, cross-slope, curb-ramp, detectable-warning, and inspection requirements. Use the approved detail rather than a residential preset when the work enters a regulated public route.
Control joints create planned weak planes
The calculator uses a spacing limit near 24 times slab thickness and keeps the result within the short span. For a 4-inch walk, the thickness rule alone produces about 8 feet, but the narrow width and desired panel shape often lead to closer spacing. Long rectangular panels are more crack-prone; the planner flags average aspect ratios over 1.5:1.
Place joints at changes in width, corners, intersections, and other stress concentrations. Saw-cut depth is estimated near one-quarter of slab thickness. For machine saw-cutting, timing is critical: cut within 4 to 12 hours of finishing, before random shrinkage cracks appear on their own. Tooled joints must be formed immediately after the edging pass and re-run later in the finishing sequence to ensure the groove does not re-bond.
Isolation joints solve a different problem
Control joints encourage where shrinkage cracks form. Isolation joints separate the walk from elements that should move independently, such as foundations, stoops, columns, curbs, and existing slabs. Do not treat the two joint types as interchangeable.
Support and drainage still control the job
Prepare and compact the base, avoid trapping water, and maintain the project’s required drainage and accessibility slopes. A consistent 4-inch form depth over a wavy base does not produce a consistent 4-inch slab. Check depth before the truck arrives and adjust the quantity for real conditions.
In freeze-thaw climates, specify at least 3,000 PSI air-entrained concrete with 5–7% total air content to protect against surface scaling. Light-duty pedestrian walks in mild climates can use 2,500 PSI. Dampen the compacted base right before the pour — a dry granular base draws moisture from fresh concrete and can cause early-age shrinkage cracking at the bottom of the slab. Do not finish while bleed water is visible on the surface; apply the broom finish, then immediately apply curing compound or cover with plastic sheeting kept in contact with the surface for at least 7 days.
Sidewalk thickness and joint reference
A walkway is mostly about controlling where it cracks. The planning values below follow ACI 330R and common accessibility practice — public or accessible routes always defer to the governing standard and the local public-works detail.
| Parameter | Typical value | Note |
|---|---|---|
| Residential walk thickness | 4 in | Pedestrian sections. |
| Vehicle crossing thickness | 6 in | Reinforced; calculate separately. |
| Control-joint spacing | ≤ 24 × thickness | ≈ 8 ft at 4 in; keep panels near square. |
| Saw-cut depth | ¼ of thickness | ≈ 1 in on a 4-in walk. |
| Saw-cut timing | 4–12 hr | Before random shrinkage cracks form. |
| Cross-slope (accessible) | ≤ 2% | ADA limit for accessible routes. |
Step by step: pouring a sidewalk
Long, narrow pours look easy in cubic yards but live or die on base prep and joint timing. This sequence follows NRMCA and ACI flatwork practice.
- Lay out in panels. Set a string line, mark the width, and plan roughly square panels with separate sections at crossings and landings. Hold any accessible-route cross-slope to 2% or less.
- Excavate and base. Strip and compact the subgrade, place a 4-inch granular base, and dampen it just before the pour so dry gravel does not pull water from the slab.
- Set forms to the slope. Pitch the cross-slope about ¼ inch per foot to drain, using flexible forms for curves and bracing them against deflection.
- Place and screed. Order 3,000 PSI (air-entrained at 5–7% in freeze-thaw zones, 2,500 PSI acceptable for light walks in mild climates) and screed between the forms.
- Float and edge. Bull-float before bleed water appears, then run an edger around the perimeter.
- Joint on time. Tool joints immediately after edging and re-run them during finishing, or saw-cut 4 to 12 hours after finishing at one-quarter of the slab depth. Isolate the walk from foundations, stoops, and existing slabs.
- Broom finish. Pull a damp broom across the direction of travel once the sheen leaves, for slip resistance.
- Cure 7 days. Apply curing compound immediately after the broom pass or cover with plastic kept against the surface, and never finish while bleed water is visible.
Sources and further reading
Use this guide with the Pour Ready methodology page, local sidewalk or accessibility standards, and the weather context surfaced during pour planning.
- 2021 IRC Chapter 3 Building Planning for stair and landing context that often intersects walkway geometry at entries.
- National Weather Service for the forecast and alert context used by the ZIP and pour-date step.