Frequently asked questions
What PSI concrete is used for curb and gutter?
Municipal and project details typically call for 3,000 to 4,000 PSI, air-entrained to 5–7% in freeze-thaw zones to resist ice and deicing-chemical scaling. Always use the value in the governing standard detail.
How far apart are curb and gutter joints?
Contraction joints are commonly tooled or saw-cut every 10 to 15 feet, with expansion joints added at inlets, structures, and curb returns. The standard detail sets the controlling spacing.
Why use a white-pigmented curing compound?
White pigment reflects solar radiation and limits heat buildup on the thin, fast-drying gutter pan, while the membrane retains moisture for the 7-day curing period — together they prevent early surface scaling.
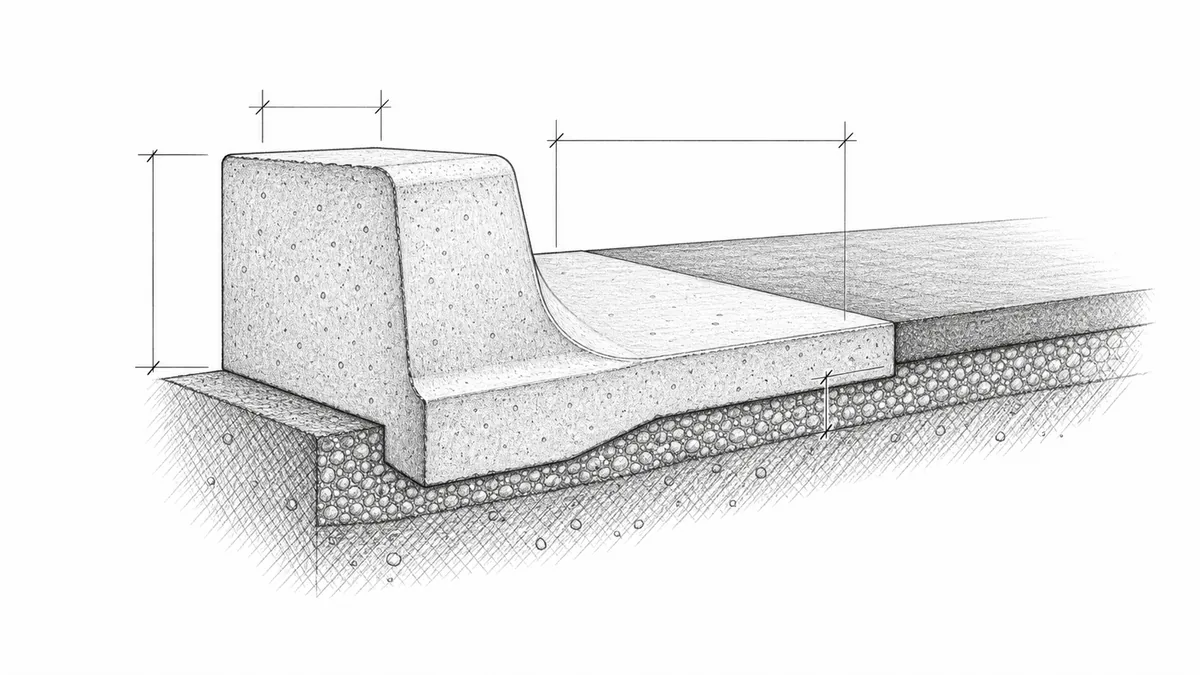
Calculate cross-sectional area first
Pour Ready combines a rectangular curb area with either a uniform rectangular gutter or a sloped trapezoidal gutter. Multiply the combined area by the run length.
Curb area = curb width × curb height
Sloped gutter area = gutter width × (inside thickness + outside thickness) ÷ 2
Keep curb height in the intended vertical unit and gutter dimensions in inches or centimeters as shown by the calculator. Unit mistakes are especially easy when field details mix feet and inches.
Use the standard drawing as the input source
Municipal, development, or DOT details may prescribe curb face, width, gutter pan, slopes, reinforcement, base, joints, concrete, and finish. Enter those dimensions rather than selecting a convenient generic profile. Right-of-way work commonly requires permits and inspection.
Separate every nonuniform segment
Driveway depressions, curb ramps, catch basins, inlet throats, transitions, curb returns, radii, tapers, and terminations change the cross-section. Measure each as a separate segment or use the quantity method specified by the project. Do not apply one full-height section through a driveway cut and assume waste will correct it.
Curves change length, not necessarily section
If the cross-section stays constant around a radius, measure the arc length along the project’s designated reference line. Clarify whether plan dimensions follow the curb face, back of curb, gutter flow line, or centerline. Long radii can create a meaningful length difference between those lines.
Placement method affects allowance
Machine-placed curb, hand-formed curb, short interrupted sections, and combined curb-and-gutter pours have different losses and logistics. Pump or machine priming, form leakage, rejected material, cleanup, and frequent starts can matter more than the simple geometry suggests. Choose waste based on placement method and project history.
Drainage is a geometry requirement
The gutter must carry water to the intended outlet without creating low points. Confirm grades, inlet elevations, transitions, and tie-ins before concrete. A correct cubic-yard estimate does not fix an incorrect flow line.
Mix, placement, and curing
Municipal and project standard details typically call for 3,000 to 4,000 PSI concrete for curb and gutter work. In freeze-thaw zones, air-entrained concrete with 5–7% total air content is required to protect against surface scaling caused by ice and deicing chemicals — the entrainment creates microscopic voids that relieve internal pressure when water freezes.
Machine-formed curb is consolidated in one continuous pass during extrusion and requires little additional vibration. Hand-formed sections should be placed in short lifts and consolidated with an internal vibrator before each lift is covered. The gutter pan is the most vulnerable element: it is thin, exposed on two faces, and dries faster than the curb mass. Begin curing it as soon as the surface can be touched without marring. Apply a white-pigmented curing compound immediately after finishing — white pigment reflects solar radiation and prevents heat buildup that accelerates surface drying. Where compound is not available, keep the surface damp under wet burlap held flat against the gutter pan for at least 7 days.
Curb and gutter reference
Curb-and-gutter work lives in the public right-of-way, so the controlling municipal detail outranks any general value. The planning figures below reflect common DOT and ACI practice for residential and light-commercial sitework.
| Parameter | Typical value | Note |
|---|---|---|
| Concrete strength | 3,000–4,000 PSI | Air-entrained in freeze-thaw zones. |
| Granular base | 4 in | Compacted to ~95% Proctor. |
| Contraction joints | 10–15 ft | Expansion joints at structures and returns. |
| Gutter slope | ≥ 2% (¼ in/ft) | Positive flow to the outlet. |
| Air content | 5–7% | Resists ice and deicing-chemical scaling. |
Step by step: forming curb and gutter
Whether hand-formed or slipformed, the gutter pan is the part that fails first if curing is delayed. This sequence follows DOT sitework and ACI practice.
- Prepare the subgrade and base. Compact the subgrade to about 95% standard Proctor density and place a 4-inch granular base of clean stone or gravel to a true line and grade.
- Set forms or slipform. Use rigid 2-inch lumber staked to line for hand-formed work, or run a slipform machine for continuous placement, checking the flow-line grade as you go.
- Place and consolidate. Fill in lifts and consolidate with an internal vibrator, taking care not to touch the form faces or disturb the subgrade and pull fines into the mix.
- Shape and tool the gutter pan. Strike the curb face and tool the gutter pan to hold at least a 2% slope so water runs to the outlet without ponding.
- Joint at 10–15 feet. Tool or saw contraction joints every 10 to 15 feet, and place expansion joints at structures, inlets, and curb returns.
- Finish and edge. Apply a light broom or float texture and edge the lip and joints for durability.
- Cure immediately. Apply a white-pigmented curing compound right after finishing — the thin gutter pan dries fastest and scales first if curing waits.
Sources and further reading
Use this guide with the Pour Ready methodology page, the standard curb detail for your jurisdiction, and any public-works grading sheets tied to the project.
- National Weather Service for weather-readiness context when the pour schedule depends on forecast conditions.
- 2021 IRC Chapter 3 Building Planning for adjacent stair and walkway context when curb work ties into residential access areas.