Frequently asked questions
How thick should a residential concrete slab be?
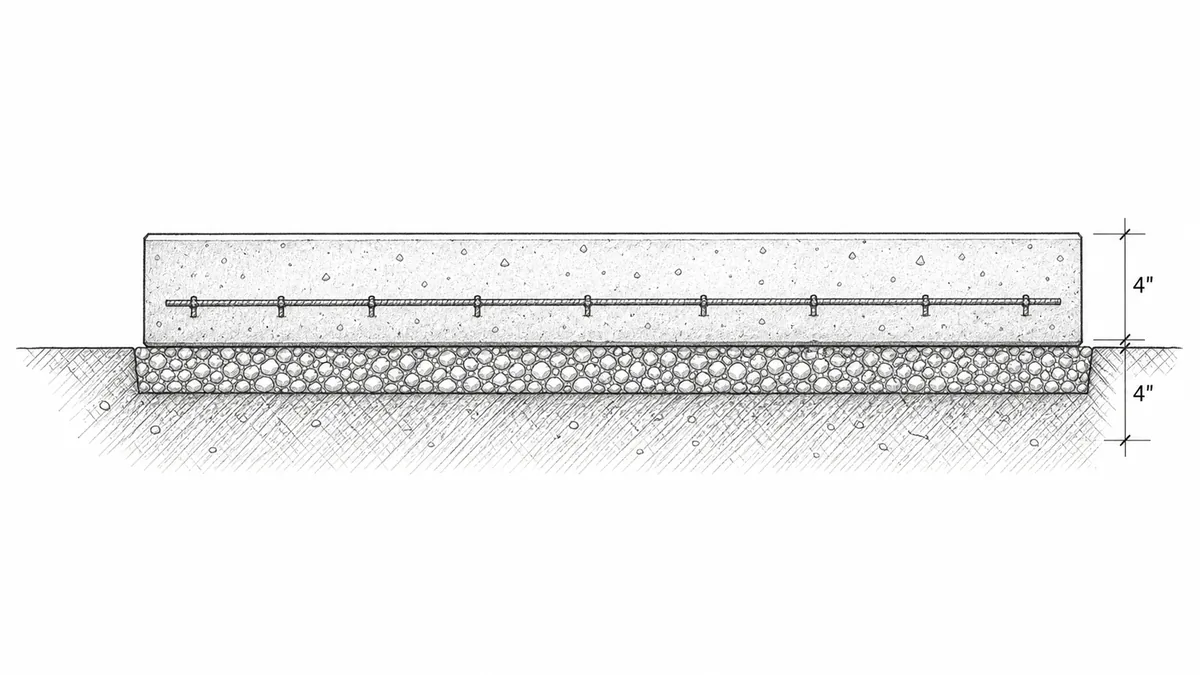
Most residential patios and general flatwork are planned at 4 inches over a compacted 4-inch granular base. Vehicle, equipment, or heavy-storage areas often move to 5–6 inches, and the structural thickness for any load-bearing slab should be confirmed against local code or an engineer.
What PSI concrete is best for a patio slab?
3,000 PSI is the residential standard for patios and walkways. Step up to 4,000 PSI air-entrained concrete only where a freeze-thaw climate or local code (IRC R403.1) calls for it; higher strength does not improve performance for foot traffic.
How long before you can walk on a new slab?
Most slabs accept foot traffic after about 24–48 hours, but keep the surface continuously cured for 7 days and wait roughly 28 days for full design strength before applying heavy loads.
Thickness changes volume directly
A rectangular slab is calculated from length, width, and thickness. Because thickness is multiplied across the full footprint, a one-inch change can add a meaningful amount of concrete on even a modest project.
In US units, convert inches to feet before multiplying, then divide cubic feet by 27 to get cubic yards. A 10 × 10 ft slab at 4 inches thick has about 1.23 cubic yards of design volume. At 5 inches, the same footprint has about 1.54 cubic yards, an increase of roughly 25 percent before waste.
Start with use, support, and project requirements
The Pour Ready patio preset starts at 4 inches, but that is a planning example for general residential flatwork. Vehicle loads, hot tubs, masonry, lifts, equipment, storage racks, expansive soil, weak or disturbed subgrade, and freeze-thaw exposure can justify a different section. The calculator can estimate any entered thickness; it does not decide the structural thickness.
Keep thickened edges, grade beams, ramps, drains, recesses, and separate pads out of the simple slab rectangle. Measure them as additional shapes. Using one thick average to hide several different sections makes it harder to verify the order and can overstate or understate the real placement.
Thickness affects joint planning
The planner uses a control-joint spacing limit of roughly 24 times slab thickness and caps that spacing to the slab footprint. It also estimates saw-cut depth at about one-quarter of slab thickness. Those are planning rules, not a substitute for a joint layout that accounts for re-entrant corners, penetrations, columns, door openings, and construction sequence.
Panels should remain reasonably square. Pour Ready flags an average panel aspect ratio above 1.5:1. Isolation joints are a different category from control joints and may still be needed where the slab meets fixed structures.
Base and reinforcement are separate decisions
Adding concrete thickness does not repair poorly prepared support. Base material, drainage, compaction, reinforcement position, cover, and curing all affect performance. The calculator estimates compacted base volume and a larger loose order quantity using the selected compaction factor. Reinforcement output is a material takeoff based on entered spacing and cover, not a structural schedule.
Order from measured conditions
Measure forms after excavation and base preparation where possible. Uneven subgrade, bowed forms, edge overbreak, pump priming, spillage, and inaccessible leftovers all influence waste. Choose a waste percentage that reflects the job instead of assuming more thickness automatically solves uncertainty.
Mix strength, finishing, and curing
Residential patios and general flatwork typically specify 3,000 PSI concrete. Slabs in freeze-thaw climates or under heavy loads may warrant 4,000 PSI air-entrained concrete with 5–7% total air content, as required by IRC Table R402.2 for moderate and severe weathering regions. Air-entraining creates microscopic voids that relieve internal pressure when water freezes, preventing surface scaling and spalling.
Finishing timing matters as much as mix design. Wait until foot pressure leaves only a ¼-inch indentation before troweling. Finishing while bleed water is still visible drives excess moisture into the surface layer and causes dusting or scaling over time. Once finishing is complete, begin curing immediately — a delay of even 2 hours can meaningfully reduce surface strength and durability. ACI 308 recommends 7 continuous days of moist curing using wet burlap, polyethylene sheeting, or a membrane-forming curing compound applied right after the final finishing pass.
Slab thickness and strength by use
Thickness and specified strength are two separate decisions, but they are usually chosen together from how the slab will be used and the weather it will face. The planning baselines below are drawn from ACI 302.1R, ACI 330R, and IRC Table R402.2. Confirm the controlling value for your project with the local building department.
| Use | Common thickness | Typical strength | Planning note |
|---|---|---|---|
| Light walkway or path | 3–4 in | 2,500–3,000 PSI | Pedestrian only; air-entrain in freeze-thaw zones. |
| Patio or general flatwork | 4 in | 3,000 PSI | Residential standard for foot traffic and furniture. |
| Shed or equipment pad | 4 in | 3,000 PSI | Heavy equipment may need 5–6 in plus rebar. |
| Driveway or vehicle slab | 4–6 in | 3,000–4,000 PSI | 4,000 PSI air-entrained where IRC R403.1 applies. |
| Garage floor | 4–5 in | 3,500 PSI | Required by ACI 302.1R; see the garage guide. |
Higher strength does not substitute for adequate thickness, base, or jointing. Upgrading a passenger-car slab to 4,000 PSI buys little benefit unless code or a freeze-thaw climate requires it.
Step by step: placing and finishing a slab on grade
Most slab failures trace back to subgrade preparation or finishing timing, not the mix. This sequence follows ACI 302.1R and NRMCA field practice for a residential slab on grade.
- Prepare the subgrade and base. Strip topsoil and vegetation, then compact the subgrade to about 95% standard Proctor density. Place and compact at least a 4-inch granular base of crushed stone — avoid uniform "cushion sand," which cannot be stabilized. Never pour on frozen ground.
- Set and brace the forms. Use 2×4 or 2×6 lumber braced roughly every 2 feet so the forms do not deflect under concrete pressure. Pitch the surface about ¼ inch per foot (2%) away from any structure, and isolate the slab from walls and columns with ½-inch isolation-joint material.
- Place to a workable consistency. Order 3,000–4,000 PSI per exposure, with 5–7% air entrainment outdoors in freeze-thaw zones. Keep slump at or below about 5 inches for slabs in removable forms, and resist adding water on site — it permanently weakens the surface and increases shrinkage.
- Screed immediately. Strike off with a rigid straightedge in a sawing motion across the form tops, keeping a small roll of concrete ahead of the screed to fill low spots.
- Bull-float before bleed water appears. Float once to embed aggregate and remove ridges. Do not overwork the surface — that brings up a weak layer of fines.
- Wait for the bleed water to leave. Let bleed water rise and evaporate completely. The slab is ready for final finishing when a footstep leaves only about a ¼-inch indentation.
- Edge and cut joints. Round the perimeter with an edging tool. Cut contraction joints about one-quarter of the slab depth (roughly 1 inch on a 4-inch slab) and keep spacing at or below 24–36 times the thickness, generally not more than 15 feet.
- Float, then broom. Float to close the surface, then drag a damp broom across exterior slabs for traction. A smooth steel-troweled exterior surface is dangerously slick when wet.
- Cure immediately for 7 days. Apply curing compound or cover with wet burlap or polyethylene right after finishing. Seven continuous days of curing develops roughly 70% of design strength; full strength arrives near 28 days.
Ordering and weather windows
Concrete is sold by the cubic yard, and a standard ready-mix truck carries about 10 yards. Orders below that minimum trigger a short-load surcharge averaging $53 per yard below the minimum, so a 5-yard pour can add roughly $265 to the invoice. Below about 0.75 cubic yard (about 34 eighty-pound bags) hand-mixed bags are usually cheaper; above 1.5 cubic yards ready-mix almost always wins. Add a 5% waste factor on a clean slab and up to 10% on irregular or earth-formed work.
Sources and further reading
Use this guide with the Pour Ready methodology page, local permit or inspection handouts, and the product data used by your ready-mix supplier or bagged-mix manufacturer.
- ACI 318 official code page for structural-scope boundaries when slab support or reinforcement becomes design work.
- 2021 IRC Chapter 4 Foundations for residential code context that can affect slab-adjacent foundation decisions.